Wednesday, February 28, 2018

Crochet Necklace Idea - Bunting Necklace

 
I have toyed with the idea of making a bunting necklace, where I would match crochet with textile, but in the end it was crochet only.
 
I crocheted long {triangle} pieces which I strung onto a wire and to make the piece compact I didn't sew them together - that would have been too stiff - instead I joined them at the middle using jump rings and also at the ends, but left the last ones free so they can stand / hang naturally. I added different seed beads and sequins to make it more attractive.
Needless to say this is my new favourite piece!


Monday, February 26, 2018

Wall Mural by Photowall - My Green Roses on Wood


This is a sponsored post.
 
There is one click between you and a wondrous world of wall murals. A world created by the sweetest of dreams, playful imagination and captivating fantasy.  
 
When I entered it, I stood there in awe while my inner child pulled my arm towards the weaved fairy tales, my teenage self wowed at the hip city images and my adult self was mesmerized by the nature and art murals. The world that stole my heart is called Photowall.


What is Photowall: They are a Swedish company with a passion for design and quality. Their wall murals and canvas prints are environmentally friendly, fire-retardant in accordance with Swedish standards and do not fade in sunlight. All their motifs are selected with care.

They offer wall murals with over 3.000 motifs from more than 70 designers and their canvases are made from 100% cotton. You can even have a mural made of your own design. All you have to do is upload your image. Isn't that amazing?


I chose this mural which is called "My Green Roses on Wood". What I loved most is that you can crop the image according to the size you want to order.


It arrived within a week,  along with a wall paste. It was accompanied by thorough instructions and there is also an immensely helpful video on youtube. So with our so little to almost non-existent experience with mounting a wall mural, putting it up was a real breeze.

The quality of the paper and print is top! The bedroom is extra special now.We are absolutely smitten by our mural!

Some of my favourites:


What is also very exciting is that Photowall are giving 20% off using the discount code MayaKuzmanCampaign2018.It will be available for 30 days.
 
They ship worldwide but if  you are in Europe, they have free delivery in the EU.
 
Follow their Facebook and Instagram for news and updates.

I hope you get equally mesmerized as we were!


Sunday, February 25, 2018

What I Have Pinned Lately #9


I cannot believe that I missed one of these posts in January! I had to check my posts plan, and yes - it is there, but I actually didn't make it.
 
 
So after a little, unplanned break, here we go again.
 
This is a lovely idea how to use big grannies and turn them into a cardigan. I love the whole piece, but the sleeves are gorgeous.


Kirsten has offered this mind blowing blanket pattern for free. What an amazing one it is!


Speaking of hexagons, this lovely bag happened in my feed. Such a great sight for sore eyes, and certainly a must have for the upcoming spring.


I haven't mentioned before, but I tried my hand at C2C crochet. I just made a tiny piece just to see what it looks like, and let me tell you it looks like lots of fun. This particular blanket itches you to try it too, if you haven't already.


 Enjoy your Sunday!

Friday, February 23, 2018

How to Wash Your Crochet Jewelry


One of the most important thing that crochet jewelry lovers want to know is how to take care of crochet jewelry.
 
Mercerized cotton jewelry, is very rewarding to be worn but sadly it does get dirty if worn frequently, and the dirtiness shows especially if it is made in light colors.
 
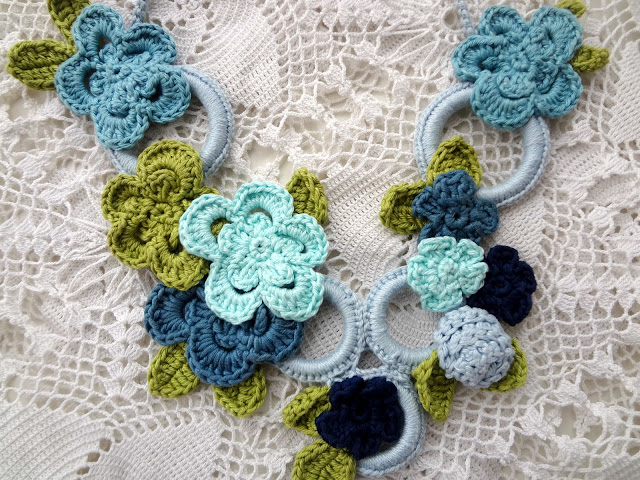
I filmed a short video how to wash a necklace, and for the video I used the above necklace which I have had for 6 years now and wear it almost every week. I am quite proud with it because it doesn't show any signs of wear or tear after so many years.
 
Now the video is without any sound. I removed it because I didn't like the acoustics in my bathroom, and please note that I am not a brute although I look like a savage washing the poor thing. The explanation - although I think the video is self-explanatory - is below the video.


(click on the full screen icon to make it bigger)
 
Washing crochet jewelry:
 
1. Let your crochet jewelry (necklace) soak in warm water for a couple of minutes.
 
2.Then add a drop of shampoo. I love using hair shampoo because it makes the piece extra soft, but add just a small drop because it lathers much. Gently massage the crochet pieces - in this case the flowers and leaves.
 
3. When done, rinse thoroughly.
 
4. Press it to get excess of water out.
 
What the video doesn't show is that after being washed, I use a nice fluffy towel onto which I lay the necklace and cover it with the towel so that it collects all the remaining water. I tap it gently and leave for about 15 minutes and then change a new (dry) towel onto which I leave the necklace to air dry.
 
A very important thing to have in mind is that if your crochet piece has any metal parts, you should immediately dry those parts and even use the hairdryer to dry it faster because it might ruin your jewelry. The necklace shown above has no metal parts. The rings are plastic but they pose no danger. Also if you have any wooden parts, above tip should be followed (as for the metal parts).
 
 
A beautiful quality cotton yarn has is that it gets sturdy when dried so you don't need to iron it at all. I always pay attention when laying it to dry  that no leaves nor flowers are bent or squeezed,  so that I won't have to iron it when done.
 
 
Hope this was helpful. If you have any other tips, please share in the comments.


The pattern for this necklace is here.


Wednesday, February 21, 2018

DIY Victorian Necklace


Remember my Victorian Mixed Media Necklace I made last month? Well, it got a lot of positive feedback and inquiries for a tutorial so here it is, for your crafting pleasure. I kind of stuck to the {almost} same color combination with some different crochet flowers and beads.
 
What you need for your necklace?
1. A doily or a crochet piece you can use as the foundation.
3. 1 Tulle Pom-Pom {I used this technique to make it}  
5. 2 Crochet flowers (this post contains links to 6 flower patterns) .
6. {optional - Beads, jewelry parts, old brooches, trinkets}
7. 2 jump rings, a clasp and a chain.


I have tons of doilies. Literally. But they have an immense emotional value so I didn't have the heart to use any. Instead I used a piece of a factory made crochet tablecloth I have in my stash. It had a flower shaped at the corner so I cut it out and because it was very thin and fragile I cut another piece to back it up. So make sure that your piece is sturdy enough to carry the entire composition.

I folded it at the upper part, pinned and sewed both together.


Next, and this is the fun part, play with the elements and work on your design. I loved my previous one, so I made this almost identical to it.


Gradually add and sew the elements onto the doily.

 
When the assemblage is done, add a jump ring at each end and attach the chain. And the necklace is done.


Monday, February 19, 2018

Insta Love: Zazi Vintage


Happy Monday all!

Today I want to put the focus on a brand that embraces and promotes traditional ethnic craftsmanship - a collaboration project including artisans from all over the word, where the emphasis is placed on sustainability and women's economic and social independence.


Jeanne ZIZI Margot de Kroon, the founder of Zizi Vintage, having worked for a big and unethical retail company,  decides to completely quit the modeling industry and focus studies and worldwide women empowerment projects because as she says:
 
"Fashion for me means story telling and the stories of the clothes I wear have to resonate to my beliefs. Because of this, I now no longer shop in chain stores, big companies or online. From countries like Guatemala to India, Lithuania to Ethiopia, I have gathered my wardrobe and found the most intriguing and inspiring pieces that all carry a unique story and connect me to another time, place and or person. 
 
I want people to know exactly where their clothes are coming from, by who they are being found by and exactly who they are supporting with their purchases. Portraying both these sides, I believe I can create a bridge, passing over what I have learned and continue to learn but also receiving lessons from the women of all corners of this wonderfully weird and beautiful planet earth that we are apart of".

Read more about the brand and the vintage chapters they created here.


Friday, February 16, 2018

Sprouting


Snowdrops, primroses, wild violets... They have all sprouted tricked by the fair weather tickling their seeds, caressing their stems, kissing their fragile petals.

Wishing for snow and seeing that it is not going to happen this year, I succumbed to the realization that spring is inevitably on its way.

My mind switched into a different mode and this is the result of it. I chose this lovely, used vintage fabric that was a skirt in its previous life, to make a mixed media necklace that is part of the Victorian collection I am slowly enlarging.

With this I bid you farewell and wish you all a perfect weekend!


Wednesday, February 14, 2018

Tuesday, February 13, 2018

Valentine's Day: Free Patterns and Tutorials


If you've procrastinated long enough and are now in a zeitnot, don't fret.
 
I have compiled some of my old, trusted projects that have been tested multiple times and have been verified in terms of easiness of make and greatness and suitability when it comes to giving these as gifts.    
 
 
A crochet lariat that offers versatile styling. I have been wearing this lovingly and it is one of my favourite pieces.


There's a ridiculously easy pattern for this headband and  heart.


If you are interested in making a crochet heart that can be used to make a decorative pillow, doily or just a piece that will please your soul, the pattern is here.


I collected all my dear vintage buttons and made a unique brooch. This one might sparkle some inspiration and ideas for you.
 
 
This Valentine's necklace combines crafting and crochet that are exploited so well to produce an eye-pleasing gift.


I left this for the end as it is not a free project / pattern, but it is a very dear pattern of mine. I made it for St.Valentine's Day and it features and intricate heart headband. Although it looks difficult, the pattern is very easy to make and I really don't have to mention its appeal. I made it using as inspiration Polish gingerbread heart cookies.
More about the pattern here.
 

Monday, February 12, 2018

Instagram Love & Feel: FaerieMagazine


Hello to another new week and let it be a magical one for all!
 
My recommendation for an instagram account: FarieMagazine.
 
A quarterly print magazine that celebrates the magical and extraordinary. There's a chest full of otherworldly treasures. Get yourself a handful of fairy dust and enjoy the sprinkle!


Friday, February 9, 2018

Valentine Shabby Chic Bookmarks DIY


I wanted to make something pretty and girly for both my Valentine girl and me and my ideas revolved around making toppers that we would be able to use as decoration. But as I started working with the wire, it struck me that bookmarkers would be much more appreciated and I settled for that idea.
 
This is a good, no sewing idea that works up fast.
 
You need:
* Memory wire
* Lace or tulle pieces (scraps work fine)
* Sateen ribbons
* Glue
 
How to make it:
 
Cut about 50 cm of wire and twist it in half. I wanted something sturdy, so I doubled the wire. Shape a heart at the top and braid the wires together to the end.


Cut a strip of tulle, tie at the inside of the heart's neck. Wrap the tulle around the wire all the way down and glue the bottom part.


Cut a longish piece of ribbon and tie it at the neck of the heart. The ribbon is supposed to hang down. I wasn't satisfied how the light pink tulle's end was glued so I glued a small piece of lace to hide it.


Cut a rectangular piece of lace (about 15 cm long) and insert the heart inside. Gather the sides carefully, tucking them in behind and tie a short ribbon over it to secure it.


For this bookmark, for the heart part I put the tulle as for the first one, added a piece of lace over it and tied the ribbon. Everything's done in 10 minutes (and maybe less!).


How do you like this? Are you planning any Valentine projects? If you are, you might consider making these :)